 Relative Depth
Opens a window that lets you reposition the work plane of an elevation view or plan view using (+ or -) controls.
- Step-By-Step
- Tips and Tricks
- Related Tools
1 . Click the Relative Depth icon, which is pictured above. The icon can be found on the Layout page > Views/Grids section.
Alternative: Invoke Relative Depth using the Find Tool by searching the command name and clicking the icon, which is pictured above.
Learn more about alternative methods for launching commands.
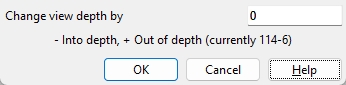
2 . The Change View Depth window appears. Enter a positive or negative (-) distance in the Change view depth by field. A positive distance moves the view out from the screen. A negative distance moves the view into the screen. Click OK to reposition the work plane of your current view.
Note 1: At this point you have not actually created a new view; you have simply changed your current view in Modeling. Use Save View As to save a complete view or Save Area to save a partial view.
Note 2: The relative depth reported in parentheses (currently...) is the distance that your current view is from the 3D model's global coordinate point 0,0,0. In the example above, the current depth is 114-6.
Alternative: Press Esc or click Cancel to end the command.
- Current view location (changed by Relative Depth)
- Save View As (to save changes made by Relative Depth)
- Work plane highlighting (a result of Relative Depth)
- Undo View Change (to undo Relative Depth)
- The SDS2 Global Coordinate System (topic)
- Add Grid Line (to create an elevation view)
- Plan View (to create a plan view)
- Section View (to create an elevation view)
- X-Y-Z display (tells elevation of a point)
- Depth checking limits (affects what can be seen in view)

